Better Bites

My experiments in healthy eating, cooking, and living

Archive for the category “Meatless Monday”

Green Beans with a Ginger Sauce

Asian Green Beans

These ginger-flavored green beans were served on a bed of kale and white jasmine rice.


Upon tasting the crisp beans, the flavor of ginger stood out the most. The soy sauce added a bit of salt and cut the sweetness of the agave. There isn’t one reason I won’t make this again.

*Recipe for the rice and kale is not included here, but I seasoned the rice with with a little garlic powder, salt, and pepper. I also added a bit of Earth Balance buttery spread to it. The kale was made the same way, but I also added some fresh minced garlic when I steamed the kale.

Asian Green Beans 2

Green Beans with Ginger Sauce:

*Serves two as a side or main dish (if you make the rice and kale to go alongside the beans)

Ingredients: 

1 tsp of sesame oil (plus a little more for drizzling)

3-4 cups of fresh green beans, ends trimmed off

1 tbsp of water

1 – 2 tsp of freshly grated ginger

1 1/2 tsp of soy sauce

1 1/2 tsp of agave nectar

1/4 tsp of freshly grated pepper and garlic powder

Method: 

Add the sesame oil to a frying pan or pot on medium heat. When the oil is heated add the beans. Stir them around and coat them in the oil, then put a lid on the pot and let the beans cook for about 5 minutes. After five minutes, add the rest of the ingredients and mix well (at this time you can drizzle a bit more oil on if you would like – about a teaspoon of sesame oil). Add the lid back onto the pot and let the mixture simmer for a few minutes or until the beans are still crisp, but slightly more tender. Serve immediately and top with sesame seeds if you like. Enjoy!

Spicy Jalapeno Gazpacho Topped With Grilled Corn and Culinary Firsts

Gazpacho 2

Since becoming a vegetarian in February and later trying to eat an entirely plant-based diet, I have cooked, prepared, and tried many new foods. Eating a plant-based diet has helped me to become more creative in the kitchen and to avoid making and remaking the same recipes over and over again.

One of my latest firsts was making gazpacho. I’ve never made a chilled soup before, let alone eaten one. That is where my new(ish) food processor came in handy. After first tasting my spicy gazpacho creation, I was addicted. I gobbled up the whole bowl and vowed to make more in the near future. The flavor from the jalapeno was slightly spicy, but the cucumber helped balance the heat of the hot pepper. The lime added just the right amount of sweetness to the soup and the spices and garlic kicked it up a notch (as Emeril Lagasse would say). I also enjoyed the added texture of the corn with the smooth soup. Do you have a favorite summer soup?

Making gazpacho was a culinary first that paid off. The grilled corn was another foodie first of mine. If you missed the how to and recipe for grilled corn and chili-spiced snap pea salad, you can find it here.

Grilled Corn

“Grilled” corn without the grill.

Spicy Jalapeno Gazpacho Topped with Grilled Corn:

*Makes two small to medium bowls of soup or one large bowl

“Grilled” Corn Ingredients:

1 cob of corn, remove the husk

1 tsp of olive oil

1/2 tsp of dried cilantro and chili powder

A dash of salt and pepper

Guacamole Ingredients:

1/2 an avocado, diced

1 clove of garlic, minced

1/2 a lime, juiced

1/4 tsp of salt, pepper, and garlic powder

Optional: diced tomatoes, jalapeno, onion (I just kept mine simple using an avocado, garlic, lime juice, and several spices)

Gazpacho Ingredients:

2 1/2 – 3 cups of diced tomato

1 medium cucumber, diced

1 jalapeno, diced (or 2 for more heat)

2 cloves of garlic, roughly chopped

1 – 2 tsp of extra virgin olive oil

1/4 tsp of black pepper, sea salt, and garlic powder

1 tsp of dried cilantro or 3 tsp of freshly chopped cilantro

1 lime, juiced

Method:

The “grilled” corn was inspired by Shannon’s genius recipe for grilled corn made without a grill, which can be found on her blog Move Eat Create (click here for a link to her how to post and recipe for corn and yellow pepper relish). I followed her cooking instructions, just changed up the spices a little bit. If you have a grill obviously you can just use that!

To make the “grilled” corn without a grill, first remove the corn husk and turn the broiler on. Then, gently rinse the corn and pat it dry. Add the olive oil and spices to the corn cob and make sure they are distributed evenly. Put the corn cob on a broiler safe baking pan and put it about 5 inches away from the heat. Let it cook for about 5 minutes and then turn it 1/4 of the way. Do this until all sides of the corn have been “grilled.”  Set the corn aside to cool. When it is cool you can slice it off the cob and set it aside until the gazpacho is ready.

To make the guacamole, just halve the avocado and dice it small. Add the avocado to a bowl with the other ingredients and mash with a fork. Put it in the refrigerator to let the flavors combine.

To make the gazpacho, combine all of the ingredients in a food processor. Turn onto the highest speed and process until the mixture is smooth. Add additional spices to taste before serving (if needed). Chill for about 10-2o minutes before serving, if your ingredients were not chilled before adding them to the food processor.

When serving, add the gazpacho to a bowl. Then top the gazpacho with the grilled corn and top the grilled corn with the guacamole or avocado slices. All three recipes are very simple to make, yet they are still entirely delicious (especially when served together). Enjoy!

Gazpacho 1

“Grilled” Corn & Sugar Snap Pea Salad

Snow Pea Salad 2

This “grilled” corn and snap pea salad did not come to fruition without obstacles, but I persevered because I had an idea of how great the end result could be (and it was). It all started when I read Shannon’s post about how to grill corn without a grill (find the link to her post here: “No Grill? No Problem! Roasted Yellow Pepper Relish” and her blog link here:  Move Eat Create – her recipe looks delicious by the way!). She had the idea to “grill” corn under the broiler. Genius, right? The corn comes out of the oven “grilled to perfection,” perfectly cooked, with char marks and all.

The end result was so grand, I nearly forgot about the fires I was putting out along the way. I mean really, after the incidents I had, I’m seriously considering getting a fire extinguisher.

So, back to my story. I saw Shannon’s lovely post for her corn relish and grilled corn how-to and I knew I had to make that corn. I just had to add it to a salad. Several foods immediately came in my mind: snow peas (after just buying some from the local farmer’s market), black beans, lime, chili powder, and creamy avocadoes (because really, what salad is complete without avocado?). That was this salad’s inception.

Though, in the making it all nearly came crashing down. I prepped my corn by removing the husks, gently rinsing the cobs, and then patting them dry. I added a bit of olive oil, dried cilantro, and chili powder to the corn (just a tad different than Shannon’s recipe). They looked gorgeous already. As I turned the broiler on, I admired my tasty looking corn.

When the oven was heated, I put the baking sheet about five inches from the top of the oven. The corn cobs were close enough to brown after turning them every five minutes. At about the second turn, I went in to grab the baking pan and accidentally touched (and torched) the side of my arm to the oven rack. I pulled back hopping to and fro on one foot while blowing on my singed arm. After running it under some cool water, I went back to my post, turned my corn, and put them back into the oven.

I thought my bad luck was over, but not soon enough did I pull the corn out to turn it a third time, when I touched the tip of the oven mitt to the hot coils at the top of the oven. Immediately I saw a flame. A look of panic crossed my face. Almost instantly, the flame put itself out. The oven mitt now had a small black badge of honor, similar to the size of the one now on my arm. After these first few unfortunate events, it was smooth sailing, mostly because the other ingredients were raw and there weren’t as many opportunities for me to be careless (as I can sometimes be while in the kitchen – something I need to work on).

 If you don’t have a grill and you try the broiler method, I’m 99.9% confident you will not encounter the problems I did. This is mainly because I have faith in all of you as home cooks and also because you’ve been forewarned. Read on for a completely delicious recipe (a little sweet, spicy, creamy, and somewhat tart).

Snow Pea Salad

Grilled Corn and Sugar Snap Pea Salad:

*Serves 2

Ingredients:

1 cob of corn, grilled (either in the oven or on a grill – I drizzled a bit of olive oil on mine, then added some dried cilantro, and chili powder)

2/3 cup of black beans, rinsed

1 cup of sugar snap peas, rinsed and ends removed

1/2 of an avocado, skin removed and diced

1 jalapeno, diced fine

1 large clove of garlic, diced fine

the juice of 1/2 of a lime (or more to taste)

2 tsp of olive oil

1/4 tsp of sea salt, freshly ground pepper, and garlic powder

1/2 – 1 tsp of chili powder (or more to taste)

Method:

Cut the corn off the cob by holding the cob upright as you carefully slice as close as you can to the cob, removing the kernels. Add the kernels to a bowl with the rest of the ingredients and mix them well. It is that simple, which may even make this summer salad more delicious. Enjoy!

Spice Up Your Weekend with Chili Spiced Sweet Potato Fries and Spicy Chipotle Ketchup

Chipotle Ketchup

Admit it, back in the 90’s you listened to the Spice Girls’ music or if you’re a man, maybe you had a crush on one of those platform-wearing ladies.  Sadly, I’ll admit I used to listen to them too, but I took it a little farther than that.

As a preteen girl, I looked up to the Spice Girls. I went to one of their concerts, I used their signature peace sign in photos, and I even bought some of their apparel (which I wore to the concert). This is where it gets [more] embarrassing.

My cousins and I formed a girl “band” group based on the Spice Girls. I will not divulge the name of this so called “band” (if you could even call us that) because if you already weren’t in hysterics, you would be once you found out the name. As a “band” we combed through each others closets looking for outfits to wear to the lone photo shoot we had, which was basically just us getting together and having my grandma take pictures of us as we posed on her lawn (sad, but true). Oh we had it bad. We had the Spice Girl bug and it wasn’t going away.

We even held performances for our family during birthday parties or special occasions. Yes, I know this just keeps getting worse. We didn’t really sing, unless you count some bad lip syncing. We were more of a dance group. One of my cousins had been dancing for years and she made up all of our routines.

Looking back on those memories, I can laugh about the poses we made for the camera, the over-the-top outfits we wore, and the smooth (or lack there of) moves we made while grooving to the Spice Girls’ music. These are memories my cousins and I will share and laugh about for many years to come. 

In honor of those memories and of going to my first concert ever (yes, it was a Spice Girls concert) many years ago, I’ve made some tasty, chili-spiced sweet potato fries and a spicy chipotle ketchup to serve alongside the mild-flavored fries. I found the recipe for the chipotle ketchup on Shae’s blog titled Hello Homebody. She also recently featured a recipe for a cooling coconut, vanilla, and lime drink, which I may have to try. Here is a link to the recipe for the ketchup recipe (the only changes I made were to use 1/2 the sugar and to use coconut sugar instead of brown sugar). I didn’t feel the need to rewrite it because I made only very minor changes to her tasty recipe. This is one recipe I will surely use again and the leftovers from this last batch will last for the next few weeks, which means I’ll be making sweet potato fries again promptly.

Chili Sweet Potato Fries 1

Getting ready for the oven.

Chili Spiced Sweet Potato Fries: 

*Serves 2

Ingredients: 

1 large sweet potato, peeled, then sliced to 1/4 inch thick slices, then sliced lengthwise to make fries

1 tbsp of olive oil

1/2 tsp of chili powder

1/4 tsp of garlic powder, smoked paprika, and freshly ground pepper

1/4 tsp of salt

Method: 

Preheat the oven to 375 degrees. Then, slice the sweet potato into fries (after peeling it). Place the fries onto a baking sheet. Drizzle about half of the olive oil on the fries and mix them around on the baking sheet. Then add all of the spices except for the salt. Add the rest of the olive oil and mix around again. Arrange the fries so all of them are laying flat on the baking sheet. Pop them into the oven for about 20 minutes. Then stir them around or flip them and pop them back in for another 20 minutes to crisp up even more (they should be golden brown when done). While they are in the oven make Shae’s recipe (from Hello Homebody) for chipotle ketchup (find the recipe here). Her recipe was fantastic, which is why I didn’t rewrite it here. The only changes I made to her recipe were to use coconut sugar and to use half the amount of sugar. Enjoy!

Southwestern Stuffed Mushrooms and Confessions of a Dog Mom

Southwestern Stuffed Mushroom 1

I feel slightly embarrassed to admit this, but I sleep with two tiny cockapoos. They’ve stolen my heart and now it seems that I can’t kick them out of my bed. Now you should know I never intended it to be this way. Oh no, since the day I adopted these two poodles (in my mind) I had them sleeping in their comfy dog beds, which were in their crate.

But then, (you know there’s a but coming on) they started whining, which made me feel like a terrible dog mom (sadly it’s what I think of myself as now). So I let them out of their crate and into the bedroom. In my head I made an agreement with myself that they could sleep on the floor by the bed. Of course what I didn’t think about was the fact that these two little creatures had a bit of terrier in them and they are good jumpers. They kept jumping up on the bed even after I told them to get down. It was like a three ring circus in the bedroom that night.

Finally, Max understood he was not to come on the bed, but then he gave me this terrible look and it was as if he said “Mom, don’t you love me?” So yet again, the dogs won. They started sleeping on the bed. Since December, which was when I first adopted them, they have gotten very comfortable on that bed. They even have their own “spots” now. Oh what is a girl to do? Do your four-legged friends have a place on your bed too? Is it something to be ashamed of? Most of my non-dog-owning friends don’t seem to understand that these two little poodles sleep on my bed (sometimes Layla even creeps up onto the spare pillow).

(Wo)Man's best friend times two.

(Wo)Man’s best friend times two. Getting very comfortable on what they’d like to think of as their bed. 

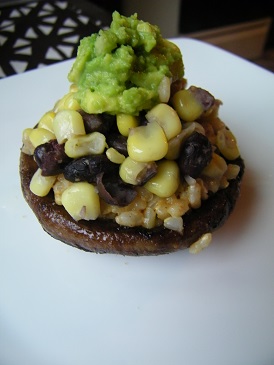
Aside from sleeping with two adorable creatures, this post is also about the Southwestern stuffed mushrooms I recently cooked and then promptly devoured. Anything with guacamole is delicious in my book. I’m also a sucker for portobello mushrooms and chili-spiced corn salad. So for me, this recipe was a winner. I hope you enjoy it too!

Southwestern Stuffed Mushroom 2

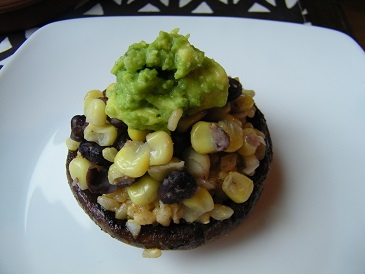
Southwestern Stuffed Mushrooms:

*Serves 4

Ingredients:

For the rice layer:

1 cup of short grain brown rice, or the rice of your choice

1 clove of garlic, minced

2 tsp of extra virgin olive oil

1/4 tsp of salt, garlic powder, and pepper

*1/4 tsp of dried cilantro, or 1 tsp of fresh cilantro, diced (optional)

For the mushroom layer:

2 tsp of olive oil

4 (or more-since the filling should fill more than 4) large portobello mushroom caps

1/4 tsp of sea salt, pepper, garlic powder, and cumin

For the corn salad layer:

2 tsp of olive oil

2/3 cup of corn

2/3 cup of black beans

1/4 tsp of salt, pepper, garlic powder, and chili powder (or more to taste)

a tiny dash of cayenne pepper

a dash of smoked paprika

For the guacamole layer (four layers is pushing it, I know):

1 avocado, halved and then diced

1 clove of garlic, diced

1/4 tsp of salt, pepper, garlic powder

1 lime, juiced

1/2 tsp of dried cilantro or two teaspoons of fresh cilantro, diced

*optional: add diced tomato, red onion, etc. (I was low on the extras so I just kept it simple)

Method:

1- Make the rice according to the package or box. The type of short grain brown rice I use calls for about 2 cups of water per cup of brown rice. I set the heat to medium-high and waited until the water was boiling before turning the heat down to medium-low and letting the rice simmer for about 45 minutes until it was done (or when the water was absorbed).

2- Add all of the rest of the ingredients to the rice when it is finished. Stir it and let it sit to let the flavors combine.

3- While you are waiting for the rice to finish and after it has been cooking for about 30 minutes, then add olive oil to a frying pan and let it heat over medium heat. Add the mushrooms when the pan is hot. Sprinkle the spices on as the mushrooms begin to cook. Turn them when they start to brown on one side (about 5-7 minutes). Let them cook for another 5-7 minutes on the other side. Take them off the heat when they’re tender.

4- When you are starting the mushrooms, heat a pot over medium heat. Add all of the ingredients for the corn salad to the pot. Stir and let them heat up for about 5 minutes or so. Once all of the ingredients are warmed, take the pot off the heat.

5- Add all of the guacamole ingredients to a bowl and mash together with a fork or potato masher. It’s really that simple!

6- When all layers are finished and prepped, start by placing all of your mushrooms with the tops facing down. Fill each with rice, then the corn salad, and finally top with the guacamole. If you have an extra lime you can drizzle some lime juice over the top of each. Serve immediately. Enjoy!

Meatless Shepherds Pie with Topped with Herb Flavored Potatoes

Meatless Shepherds Pie

As the kids practically bolted from my door when the bell rang, I felt a wave of mixed feelings wash over me. The night before our last day, I was picking up the room and making end of the year goodie bags for the kids and then it hit me. They would be leaving me tomorrow: leaving me to go on to another teacher next year, to learn different things, to be in a class with different students. My eyes started to water at the thought of them not being “my” students anymore.

What an amazing group I had. They reminded me what it was like to be a kid again. They were always so full of laughter with big, bright smiles plastered all over their faces. Having them as students reminded me of how simple life can be.  They reminded to smile and to have fun (as well as to make life fun).

Sitting here a day later after my first official day of summer break, I am left with thoughts of excitement for next year, reflections on the past year, and feelings of bewilderment that I have the next two months to myself. Freedom at last. Time to take a breath after along, busy, and emotional year. I plan on catching up on my reading, doing lots of cooking (as well as eating), relaxing, and just making the most of every opportunity that comes my way. At some point(s) I also have plans to get my toes into the hot sand at local beaches.

This vacation is making me feel like a kid again. I’m smiling on the inside just thinking about all the adventures to be had. There are so many possibilities. What are you looking forward to this summer?

Aside from enjoying the start of my summer vacation, I made what I deemed the summer version of meatless shepherds pie. I could not keep myself from stealing a few extra bites, even after I was full. I had some as leftovers and it made for tasty lunch leftovers. Cheers to a delicious meatless shepherds pie and to the start of summer.

Meatless Shepherds Pie:

*Serves 4

Ingredients:

For the mushroom layer: 

1/2 cup of red lentils, rinsed

2 tsp of olive oil

1 garlic clove, diced

1-2 large portobello mushroom caps, diced

1/4 tsp of salt, freshly ground black pepper, and garlic powder (*or more to taste)

2 tsp of fresh rosemary, sliced into small pieces

1/4 cup of red wine (like a merlot)

For the corn layer:

1 1/2 cups of organic frozen corn

1 tsp of olive oil

1/4 tsp of salt, pepper, and garlic powder

For the potato layer: 

3 cups of chopped potatoes (peeled or unpeeled if the skin is thin)

1/2 cup of unsweetened nut milk (or more if need be to make it creamy)

1 tbsp of extra virgin olive oil

1/4 tsp of salt and freshly ground pepper

1/2 tsp of garlic powder

1 garlic clove, diced

1 tbsp of fresh chives, diced into small pieces

*cheese – vegan or dairy to put on top (optional)

Method: 

For the potato layer:

*start this layer first

Heat a water in a medium-large pot over high heat. When the water begins to boil, add the potatoes. Let them cook until tender or for about 7-10 minutes. When they are finished strain them, then put them back into the pot and add the rest of the ingredients. Mix well and then use a potato masher or an electric mixer to blend it all together.

For the mushroom layer: 

Heat a sauce pot 3/4 of the way full with water over high heat. When the water comes to a boil then reduce the heat to medium high and add the lentils. Cook them until tender or for about 10 minutes. Remove and drain the lentils. Set them aside.

Heat the olive oil for the mushrooms in a frying pan. Then add the garlic. When the garlic begins to brown add the mushrooms and stir with the garlic and olive oil. Let the mushrooms cook for about 5 minutes. Then add the spices and rosemary. When they are completely tender, then add the lentils. Mix well. Once that is combined add the red wine. Let the mixture simmer for another few minutes before taking it off the heat.

For the corn layer: 

Add about one tablespoon of water to the bottom of a sauce pan. Then add the corn. Heat over medium low heat and add the rest of the ingredients (garlic powder, salt, and pepper). Take off the heat when the corn is heated through.

Assembly and baking: 

Before assembling, preheat the oven to 375 degrees. In a 8 x 8 pan or medium round pan, put the mushroom mixture at the bottom. Then layer the corn mixture on top. Spread each layer with a spatula to smooth it out. Then add the potato mixture on top. Smooth it out with the spatula again. Then if you choose, add the cheese on top. Bake for about 20 to 25 minutes or until the cheese melts or the top begins to brown. Bon appetit!

Loaded Southwestern Bruschetta

Loaded Southwestern Brushetta

Just by looking at that picture, you know this is a messy recipe. If you mind getting your hands dirty,then your’e better off looking, rather than enjoying this loaded southwestern bruschetta. I am not afraid of getting my hands or face a little dirty and so I dug in. Like so many other foods, the messiness of the dish was entirely worth it. Think about it, would you avoid an ice cream cone or popsicle in the summer just to keep clean? I think not. Therefore, loaded southwestern bruschetta is a deliciously messy idea. What are some of your favorite finger-licking-good foods?

Thinking about messy summer foods reminds me of my favorite cold treat. Growing up, I was  nearly addicted to toasted almond ice cream (the kind that comes neatly wrapped, on a stick, and sprinkled with toasted almond flavored pieces). Anytime there was an ice cream truck that came by, it was guaranteed I would order a toasted almond frozen treat. I would sit at the beach eating my half melted ice cream pop, not even caring that half of it was on my hands and that the seagulls above were eyeing me. When I was finished, I only longed for more. Maybe that is why I’m also crazy for the Almond Joy.

*Find my Almond Joy Bar post here (recipe from Rawmazing) and my Almond Joy Popcorn recipe here. For an Almond Joy-inspired breakfast treat, try my Almond Joy Overnight Oats recipe (click here for the recipe).

Loaded Southwestern Bruschetta:

*Makes enough topping for about 1/2 a loaf of bread, sliced (I used a wheat loaf from Whole Foods, as I have yet to tackle making my own bread)

Ingredients:

1 avocado

1/2 tsp of garlic or more to taste (1/4 tsp for the bean/corn mixture and 1/4 tsp for the avocado spread)

1/4 tsp of salt and pepper (for the avocado spread)

1/2 of a lime, juiced

2 tsps of olive oil

1 portobello mushroom cap, diced fairly small (1/4 inch pieces)

1/2 cup of black beans

1/2 cup of corn

1 medium tomato, diced

1/4 tsp of salt and pepper (for the bean/mushroom mixture)

1/4 tsp of chili powder

a tiny pinch of cayenne pepper

1/2 a loaf of whole wheat bread, sliced into thick pieces

Method:

1- First, make the avocado spread by halving the avocado. Then scoop out the green fruit’s ripe flesh into a bowl. Add the spices and the juice of  the lime. Mix well. Then set aside in the fridge to let the flavors combine.

2- Over medium heat, add olive oil to a pan. When the pan is hot, add the diced mushroom pieces. After a couple of minutes add the corn, tomato pieces, black beans, and spices. Stir and heat until the corn is warmed through (if using frozen corn) or until the mushrooms are fully cooked. Put a lid on for the last minute of cooking to moisten up the mushrooms.

3- Spread the avocado mash on the half loaf of bread. Then, slice the bread into thick slices. Top each slice with a generous helping of the corn salad. Enjoy!

Roasted Chickpeas With a Spice Rub Topped with a Sweet Corn Salad and a Mixed CD Rediscovered

Roasted Chickpeas with chili-lime corn salad

As it happens, I am signing along to my old mixed CD right now. I know, mixed CD’s are so not 2013, just like the mixed tape was so 90’s (I think I still have one of those somewhere!).

Over the weekend, I was going through my CD collection and I found several CD’s with no label. Immediately, I was curious. Before I had enough time to wonder what was on them, I popped one into my CD player (yes, I still have and use a CD player – why give up something if it works for you?). I listened to the first song – it was the theme song to Dawson’s Creek. Oh how I loved Dawson’s Creek in high school. All of the CD’s were made when I was in high school, which also means there was some 98 Degrees on there, as well as one of Mandy Moore’s slow songs. As I listened, I realized how dated the whole CD was.

The others weren’t much better. They were filled with songs that didn’t “go” together. On the CD I’m listening to now, Jose Gonzalez’ more serious song “Crosses” is followed by the danceable “Turn Around” and then by Diana Ross singing “Ain’t No Mountain High Enough.” Oh don’t worry, the song order and choices get worse. I am mortified to admit the song “Cut Throat,” by Figure and Whiskey Pete (who they are, I have no idea) is on there too. That was followed several of Madonna’s songs: “Like a Virgin,” “Material Girl,” and “Papa Don’t Preach.” Do Madonna’s songs ever go out of style? I don’t think so. “Material Girl” even got me to my feet. I was doing a nice 80’s step touch and dancing around the house with the poodles in tow.

What was I thinking? I have no idea and yet I’m moving to the songs like I made the CD yesterday. It brings me back to my high school years, which were nearly 10 years ago now. Back in middle school, even longer ago, I was making mixed tapes to Kiss 95.7’s 9 at 9. I would sit on my bedroom floor waiting for favorite songs to come on just so I could press the record button and enjoy it later. What songs did you used to record on mixed tapes or CD’s? Feel free to share even the most embarrassing songs, as I really can’t judge at this point.

I realize that my finding my mixed CD’s has nothing to do with my roasted chickpea dinner, which was as satisfying as it was delicious. I put a dry spice rub on the chickpeas before popping them into the oven, which gave them a bit of heat upon first taste. The corn salad was a bit sweeter and helped cut the heat of the spiced chickpeas (find the recipe here – this time I just used frozen organic corn, which I defrosted, not fresh). I served it all on top of pan roasted potatoes (season with minced garlic, a bit of salt, pepper, and cumin and cook until crispy or click here for Thom’s irresistable recipe for Vegan Mexican Roasted Potatoes).

Roasted Chickpeas

Roasted Chickpeas: 

*Serves 2 with the corn salad

Ingredients: 

1 can of chickpeas, rinsed and drained

1 tsp of olive oil

1/2 tsp of smoked paprika

1/4 tsp of chili powder

a tiny pinch of cayenne pepper

1/4 tsp of sea salt and freshly ground pepper

Method: 

1- Preheat the oven to 350 degrees. Take out a bowl and pour the rinsed chickpeas in. Add the rest of the ingredients and mix well (making sure all of the chickpeas are evenly coated). Bake for about 15-20 minutes or until the chickpeas begin to turn golden brown. Taste the chickpeas after baking – if necessary add a sprinkle of salt, pepper, and paprika (as some of the spices will rub off on the pan during roasting). Serve with corn salad and pan-roasted potatoes. This would also be delicious served with rice or atop a green salad. Enjoy!

Sweet Potato Bites

Sweet Potato Bites

Lately, I’ve been thinking a lot about what makes me happy. I’ve gone through some major life changes over the past few months, which have caused me to think and rethink how I see the world and how I see myself. I broke up with someone I’d been with for three and a half years. He was a big part of my life and he helped me grow to be the person I am today, but as the last few months of our relationship wore on, it was more and more evident that we were not growing together, but apart. It didn’t feel right to me anymore and at my core, I knew I had to make the decision that was best for both of our futures (and feelings). It was difficult, but I am finally starting to feel at ease with the decision I made. That choice has made me think about what I really want in life and what I want in a partner. Right now, I’m not entirely sure about what I want out of life, but I do know I want to be happy. That is what is most important to me (and one thing I’m not willing to sacrifice).

On the eve of my 27th birthday, one of the things I am certain of are the things I enjoy doing most in life. They aren’t even complicated or extravagant things. Instead they are simple like as spending time outside, gardening, food (eating, cooking, and enjoying it with friends and family), writing, reading, and being creative (as well as appreciating others’ creativity).

Today, I was pulling up weeds in the garden, as well as planting a few extra squash plants my dad had given me and in one word, I felt content. I could have stayed out there for hours, but I had to come in and give my poodles some much-needed attention. Gardening just feels right to me. It is an activity I really don’t need to try hard to like. As Gretchen Rubin would say, “You can choose what you do, but you can’t choose what you like to do.”

What are the activities that make you happiest and that keep you going? What makes you want to wake up each morning to see the new day?

Sweet Potato Bites: 

*Recipe  potato seasoning recipe (changed only slightly) from Thom’s blog, Don’t Switch Off the Light (I’ve used his recipe for Vegan Mexican Roasted Potatoes so many times, but I never tire of it)

Ingredients: 

For potatoes: 

2 large sweet potatoes, cut into 1/4 inch slices (width-wise)

1 tbsp of extra virgin olive oil

1 large garlic clove, diced

1/2 tsp of cumin and oregano

1/4 tsp of salt, pepper, and garlic powder

For black beans: 

1 can of black beans

1 tsp of olive oil

1 large clove of garlic, diced

1/4 tsp of salt, pepper, and chili powder (adjust the amount of chili powder to suit your taste, if you like it spicier then add 1/2 tsp)

For guacamole: (*I made this recipe in the past and it was delicious)

*either use your favorite recipe for guacamole made from one avocado OR use the simple recipe below

1 avocado

1 clove of garlic

2 tsp of fresh parsley, diced

1 lime, juiced

1/4 tsp of salt, pepper, and garlic powder

Method:

1- Preheat the oven to 375 degrees. While the oven is preheating, slice the sweet potatoes and put them on a baking sheet. Then drizzle the olive oil over them. Sprinkle the spices on and then mix all of the potatoes together with the spices, until each slice is evenly coated. Bake the sweet potatoes for about 15 minutes before flipping them and cooking them for another 15 minutes. When finished, they should be tender and slightly browned on both sides.

2- While the potatoes are cooking, heat the olive oil, black beans, garlic, and spices in a pot over low heat. Stir periodically. Take off the heat and cover when the beans are warmed. *You can save this step until when the potatoes have been in the oven for about 15 minutes already.

3- Make the guacamole by halving the avocado. Then take the seed out. Score the avocado with a knife by slicing tic tac toe shaped lines on the fleshy part of the avocado (all the way down to the skin – 1 cut per 1/4 inch). Then scrape or squeeze the fleshy part of the avocado out of the skin. Add it to a bowl with the rest of the ingredients and mash with a fork. Put the guacamole in the fridge until the potatoes are ready (to let the flavors combine). *If I’d had a tomato or cilantro, I would’ve added that to my guacamole too! I just happened to be low on ingredients since the next day was grocery shopping day.

4- Assemble the sweet potato bites by placing sweet potatoes on a serving tray. Then spoon about one teaspoon of black beans on each medallion-shaped potato. Top each with a small dollop of guacamole (Oh how the word dollop still reminds me of Martha Stewart). Serve immediately & enjoy.

Lentil, Kale, & Carrot Dal

Lentil, Kale, & Carrot Dal

I’ve come to love making and eating dal. It is such a simple dish with so many delicious variations. This recipe was no different. The carrots gave the dal a crunchy texture, while the baked potato and roasted tomatoes gave a much softer feel. The slightly spicy flavor of the curry was balanced out by the sweet flavor of the carrots and tomatoes. This dish was simple to make, healthy, and provided a good amount of leftovers, which I always look forward to having at lunch. If you have any favorite dal recipes, please post them below! What is your favorite ingredient combination when making dal?

Lentil, Kale, & Carrot Dal: 

Serves 2-4 (depending on the amount of potatoes you bake)

Ingredients: 

2 – 4 potatoes (depending on the number of people you intend to serve), washed

1/2 cup of red lentils, rinsed

2 tsp of extra virgin olive oil (plus a tad bit more for drizzling over each potato)

1 large garlic clove, diced

1-2 large handfuls of kale, washed and diced into about 1 inch pieces

1-2 carrots, diced

1 can of roasted & diced tomatoes

1 tsp of curry powder

1/2 tsp of turmeric

1/4 tsp of salt, pepper, and garlic powder

Method: 

1- Preheat the oven to 375 degrees. Then wash and dry the potatoes. Poke a slit into each potato and bake them for about forty five minutes to an hour (poke a fork or knife in them to see if they are tender).

2- Meanwhile, slice and dice all of the vegetables and put a medium sized pot filled 3/4 of the way with water on the stove over medium high heat. When the water begins to boil, add the lentils. Let them cook for about 7-10 minutes or until they are tender (you don’t want to overcook red lentils, as they tend to break apart easily if overcooked).

3- When the potatoes have been in the oven for about 40 minutes, heat the olive oil in a frying pan over medium heat. When the oil is hot add the garlic. When the garlic begins to brown on the edges, add the kale and carrot pieces. Stir every few minutes.

4- After about 8 minutes (when the kale is tender – the carrots will still be crunchy), add the roasted tomatoes, lentils, and all of the spices. Stir well. Heat for about another five minutes or until all of the flavors are combined.

5- Hollow out a hole (with a diameter of about 2 inches) in each baked potato. Drizzle a tiny bit of olive oil over each, as well as a dash of salt and pepper. Serve the dal inside each potato. Enjoy!

Post Navigation

Eat Fit to Live

Healthy Living the Mediterranean Way

whole food runner

Long time runner, recent vegetarian, forever chocoholic

Eat,live,burp

Tried and tasted recipes from my kitchen to yours

Healthy H'ohm'e

Natural health and wellness with a HUGE passion for food

Saucy Pans

Food Reviews and Recipes around Bristol & Cardiff

liveng proof

to inspire a fit & healthy lifestyle

Fiesta Friday

Food + Friends = Fun

ninjamonkeyguk

A fine WordPress.com site

Sugarfree Sweetheart

an illustrated diabetic-friendly food blog

crazyrawlife

life, raw: unprepared or imperfectly prepared for use... not in a polished, finished, or processed form. global adventures.nourishing practices xx

Buckwheat for your health

Learn more about this superfood - Buckwheat!

My little jar of spices

Putting the delicious in healthy eating: gluten-free and paleo inspired recipes

Safe Eats

Educating, Cooking and Baking - To Include Everyone